Tips & tricks: Electrical system


Dials fitting
Intro:
Visibility and faster location of every dial and gauge can be improved
by using white dials on the instrument panel. Many people change the
dials to any pretty color just for an esthetic effect. :-(
To get the dials, the expensive option is to buy them in a motorstore, but
you can do them by yourself: Scan the original ones using a quality scanner
(600 dpi min. to have a good resolution), work the images with the right
software, then print them in a laser color printer: that's what my friend
Sylvain did
for me. For those who want them already made,
write to
Sylvain, it's his business to do it!
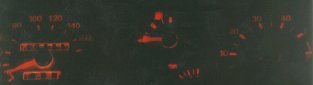
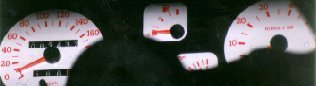
With these home-made dials, when you switch on the lights at night, if
you remove the standard dials first, you get to see the panel skeleton. To
ensure proper lighting at night, we preferred to leave standard dials below.
Light must now go through the red digits and then pass the new digits, and that's
the reason to choose red and not black as the digits color. The final result
is nice, you see reddish numbers against black background, maybe with a bit
less lighting power (it might be possible to change to higher power panel
lights!).
Procedure:
Before starting to mount the dials, be sure to have every tool handy: a
steel ruler -any precise one will do-, a small screwdriver, a fork, a 4mm
and 5.5mm bit screwdriver, a pair of short pliers, a little hammer, a
lamp, a sheet of paper with a ballpen... and of course the dials!
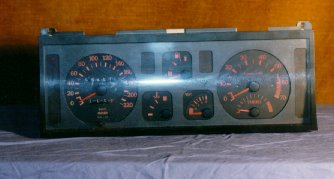
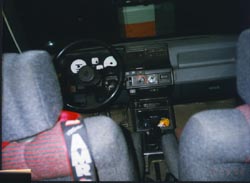
Disconnect the battery and remove the instrument panel. To do so, pull
the visor by lifting it 2 cm, it should go up without problems. Remove
the two screws located at both corners of the panel, lift the panel and
then pull it towards you 1 cm. Now that it's out of place, remove every
connector and the turbo boost hose.
 |
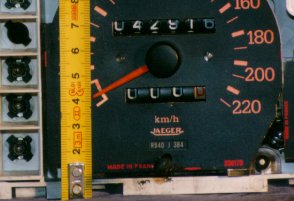
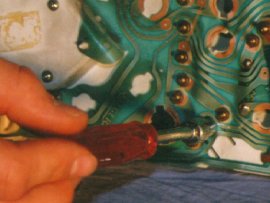
You'll have to work over a clean, flat and horizontal workplace.
Extract the front cover taking care not to ruin it and not to break its
plastic hooks. It should be better to start with the bottom ones. Put the
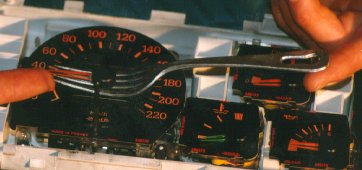
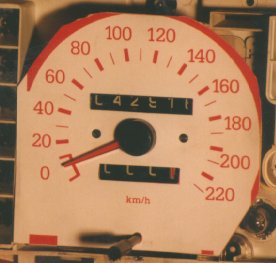
panel in horizontal position (as seen in the photo) and tap it gently so
that the needles move to their free rest position. |
| Take notes of their location related to the dial graduations
and, if possible, measuring from the horizontal plane too. Write everything
in the sheet of paper that you were advised to have above. |
 |
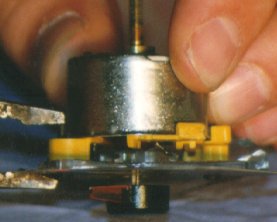
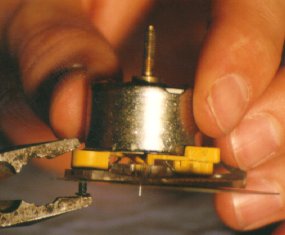
| Afterwards, you have to take out the needles,
but being very careful. WARNING: Don't do it as it's showed
into the left photo, because of the risk to bend the gauge axle. You must
pull the fork up once it's positioned correctly under the needle (right
photo). Don't be afraid to pull strongly or to see the needle fly, they're
difficult to extract. |
 |
Once every needle is removed, remove the screws that keep
the dials in place, place the new dials over and refit the screws again.
That's it! Repeat the procedure with the revs counter. Now it comes the
funny part: the three small gauges (water, oil and fuel). |
| Every little gauge has three bolts, we won't remove but
the center one with the 5.5mm bit screwdriver, being the other ones for electrical
connection. Take care not to lose the washers. |
 |
 |
There are two little rivets that keep the dial in place.
To remove them push its end with the one of the pliers end until it reaches
the yellow plastic part. |
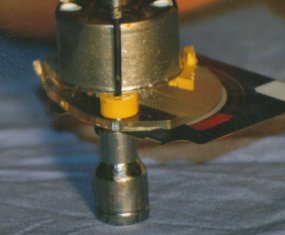
| Put the 4mm bit vertically over the workplace, hold the
gauge horizontal against it with the rivet head into the hollow, then extract
the rivet by inserting a thin screwdriver by the perforation. |
 |
 |
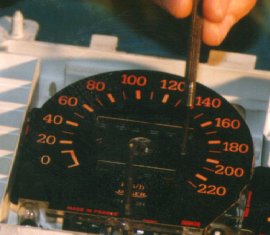
Finally, install the new dials checking that the graduations
are exactly lined with the original ones using a lamp -it's better to do
that into a dark room- and mount the rivets again. |
| To complete the rivet assembly, push the rivet head holding
the other pliers end against the yellow plastic piece. |
 |
 |
Install the needles again, paying attention to do it in
the original rest position. That can be easily checked with your previous
measures. Don't hesitate to install them several times until you obtain
the right position. |
| It lasts to mount the front cover again (trivial...) without
forgetting to clean its inner part, install the panel in place without
forgetting to plug anything again, refit the two little screws, the visor
and finally connect the battery. |
 |
 |
Notes:
The final style touch, if you used white dials, is a bit of 'Tipp-Ex' to
the black screw heads.