
![]()
![]()
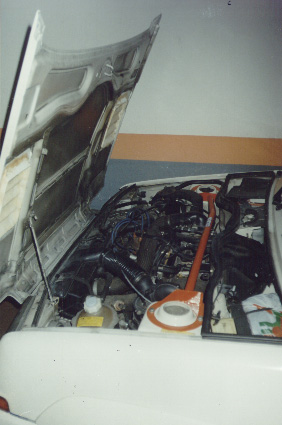
Intro:Most of the car's weight is located over the front wheels, and, during sharp turns, most of that weight moves to the external wheel. The front struts must hold all that weight through the shock absorbers, so it's unavoidable that they suffer of vibrations and small movements that take away some handling precision. Procedure:Buy and mount a strut bar to connect both suspension struts. In the photo on the right you can check how it looks like. It's not difficult to hand-made it, if you have access to soldering equipment. Notes:The handling gain is not very noticeable in a standard GTT. But on more seriously-lowered cars and/or with even firmer suspensions it should be different, as it relieves the chassis from increased forces. |
 |

![]()
Getting the bird into the (roll)cage
Nobody likes to overturn his car, but let's imagine you do it... you'd like to have a rollcage! Another pro is the absolute racing look it gives. The con is that you reduce the usability of the car. The reduction can go from just uncomfortability to enter the car to the ultimate two-seater conversion, depending on the rollcage model.
Buy and mount a rollcage. The FIA requires 45mm Ø for rallying, so it's not difficult to find 40 mm Ø second-hand ones. There are plenty of models for the GT Turbo, from those you have to weld into the car to the bolt and nut removable ones.
| I once had installed my friend Sylvain's set for one month (I bought it for him and tested it before he finally installed them). They were made of a front arch (remove the sunshades and central light console, forget about opening the glovebox), a central arch with rear wheel arch extensions, four small bars to connect them over the door and below it (jump them to sit, forget about reclining the seats) and a diagonal rear bar (dismountable). It had a foam cover over the bars, and the look was great! | 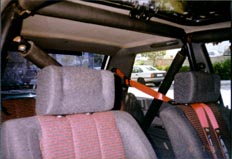 |
Legal homologation might be necessary to install a rollcage in your country (in Spain it is). It will reduce the number of people allowed to ride to two.
In a collision, your body is retained in the seat by the safety belt. Unfortunately, it's not uncommon to break your collar. A better protection can be provided by a safety harness.
Buy and install one or two harnesses. Mainly you can choose between:
Another possibility is to choose between 50 mm and 75 mm strap width, and between turnlock or push-in buckle.
An advantage of the harness is that it doesn't stay tight bothering on your shoulder, but that's why you should use it perfectly adjusted for your size (and different clothes along the year!) or it won't work at all.
To get optimal protection, the harnesses, specially if they tie to the rear pillar, should be installed on cars with a rollcage. That way you ensure no car body deformation will impact on you.
Be sure to make a proper fixing of the harness, it must handle very big forces in an accident due to the inertia of the body...
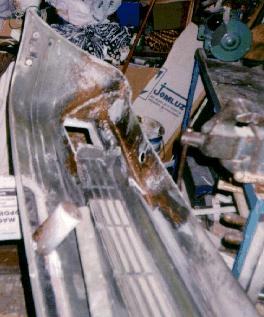
Intro:The front bumper rides too low not to break in a careless parking, for example. Small crashes will also result in cracks. But fortunately, glass-fiber parts are easy to repair. Procedure:You'll need glass-fiber. I know it's sold in sheets, but I prefer the 'bodyfiller' type kits with a tin full of paste and a hardener tube. The first point is to remove the bumper, try to put everything in place, remove the loose parts and use tools and sand-paper to get decent crack sides. If you've broken it into several pieces, some steel plate reinforcements could be necessary to put it all together. Apply clamps, weights and ropes to close the cracks and keep everything in place. |
 |
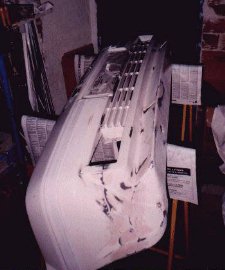 |
The glass-fiber compound, once it's mixed with the hardener, must be applied in the inner part in successive layers, letting them dry some hours. It'll restore the strength of the bumper, as long as its applied over a rough and conveniently sand-papered surface. After the first layers, the bumper will have its shape again so you can remove the clamps to work better. The outer surface will be treated as any bodywork damage. Classical filler paste will give the right appearance, since the glass-fiber finish would be too rough. Anyway you'll have to use waterproof sand-paper until you hate it to soft an level all cracks. A home-made respray can be done more easily than on steel panels because the finish of the paint on the fiber is always better, so unless you do a very poor job, you can save the professional painting money decently. |
