
![]()
![]()
The standard 13 inch wheels must be used with relatively high profile tyres like 175/60/13 or 195/55/13, to avoid letting the gearing too low. You can get into lower profiles changing rubber for alloy going for 14, 15 or even 16 inch wheels.
Decide the wheel and tyre size you want to mount. Note that a different total diameter for your wheel plus tyre combination:
This is an approximate table to compare wheel+tyre diameters with different combinations of width, profile and wheel size. Some possibilities for the GT Turbo are this color.
| Ø | 80 | 70 | 65 | 60 | 55 | 50 | 45 | 40 | 35 |
| 530 | 155/65R13 | 195/45R14 | |||||||
| 145/70R13 | 185/55R13 | 175/50R14 | |||||||
| 175/60R13 | |||||||||
| 540 | 145R12 | ||||||||
| 160/65R13 | 195/55R13 | 185/50R14 | |||||||
| 135R13 | 155/70R13 | ||||||||
| 155R12 | |||||||||
| 550 | 185/60R13 | ||||||||
| 165/60R14 | |||||||||
| 195/45R15 | |||||||||
| 560 | 165/70R13 | ||||||||
| 145R13 | 175/60R14 | ||||||||
| 165/65R14 | |||||||||
| 570 | |||||||||
| 205/60R13 | 215/45R15 | ||||||||
| 155R13 | 185/60R14 | 195/50R15 | 215/40R16 | ||||||
| 175/70R13 | |||||||||
| 580 | 195/45R16 | ||||||||
| 175/65R14 | |||||||||
| 185/55R15 | 225/40R16 | ||||||||
| 125R15 | 205/50R15 | ||||||||
| 145R14 | 185/70R13 | 195/60R14 | 205/45R16 | 225/35R17 | |||||
| 590 | 165/70R14 | ||||||||
| 165R13 | 185/65R14 | 195/55R15 | |||||||
| 135R15 | |||||||||
| 600 | 175/70R14 | 195/50R16 | |||||||
| 155R14 | 215/40R17 | 245/35R17 | |||||||
| 165R13 | 205/55R15 | 225/50R15 | 225/45R16 | ||||||
| 195/65R14 | |||||||||
| 610 | 205/50R16 | ||||||||
| 185/70R14 | 195/60R15 | ||||||||
| 235/40R17 | |||||||||
| 620 | 165R14 | 185/65R15 | |||||||
| 185R13 | |||||||||
| 245/45R16 | |||||||||
| 205/60R15 | 215/45R17 | 245/40R17 | |||||||
| 155R15 | |||||||||
| 630 | 205/55R16 | 225/50R16 | |||||||
| 175R14 | 195/70R14 | 225/45R17 | |||||||
| 195/65R15 | 255/40R17 | 255/35R18 | |||||||
| 205/50R17 | 225/40R18 | ||||||||
| 215/60R15 | |||||||||
| 640 | 265/35R18 | ||||||||
| 205/70R14 | 235/45R17 | 265/40R17 | |||||||
| 165R15 | 235/40R18 | ||||||||
| 205/65R15 | 215/50R17 | ||||||||
| 185R14 | 275/35R18 | ||||||||
| 650 | 225/60R15 | 245/50R16 | 245/45R17 | 275/40R17 | |||||
| 225/55R16 | 245/40R18 | 315/35R17 | |||||||
| 285/35R18 | |||||||||
| 225/50R17 | |||||||||
| 175R15 | |||||||||
| 660 | 215/65R15 | 255/50R16 | 255/45R17 | ||||||
| 235/60R15 | 295/35R18 | ||||||||
| 335/35R17 | |||||||||
| 205/70R15 | |||||||||
| 670 | |||||||||
| 185R15 | 225/65R15 | ||||||||
| 225/60R16 | 245/55R16 | ||||||||
| 680 | 285/35R19 | ||||||||
| 215/70R15 | 285/40R18 | ||||||||
| 235/60R16 | 255/40R19 |
If you take into account the tyre deformation at the sidewalls, there is a formula to obtain the real total LENGTH in mm of one wheel turn for a given WIDTH(mm)/PROFILE/WHEEL(inches):
LENGTH=2*PI*(12,319*WHEEL+0.0097*WIDTH*PROFILE)
I chose to change my standard 13 inch wheels to a 15 inch second hand Clio Williams set, going from my standard 175/60/13 tyres to 195/45/15.
The resulting tyre turn length change is, given the above formula:
| Standard 175/60 13 tyres | 1.65 m |
| Standard 195/55 13 tyres | 1.66 m |
| 195/45 15 tyres | 1.69 m |
The results are that I have a bit more wheel+tyre development now, so a bit more relaxation of the engine on motorways, a bit lower acceleration and that the lowering of the tyre profile makes the steering harder and more precise. But now, as someone said, now the car isn't going to send you a fax before you pass the adherence limit :-), as the feeling of the car limits that was given by the tyre profile deformation is gone! I also noticed a change into the tyre grip because of the increased width and tyre quality (I had very cheap tyres mounted before).
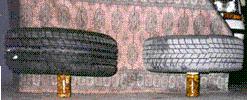
| The Williams wheels don't have much offset, using most of the width increase inside the car, as you can (try to) see in the photo in which both one old and one new wheel are supported by a same height olive can. The upper side is the wheel external side: | 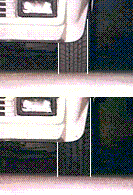 |
 |
New tyres, at least the ones I mounted, need to be rolled for a while before being pulled hard. They seem to have a slight wax coat to protect the rubber during long storage periods whose adherence is far away from that of the rubber itself.
With a different wheel and tyre combination, you'll have to work out the ideal pressures for them. The precise method would involve a good tyre temperature tester and setting the pressures that, after rolling in the kind of terrain you'll use the car into, give the inner, outer and central part of the tyre the same temperature.
I started with 2.2 bar (32 psi) all around and felt the car to lively at the rear, but that was because I was then on the previously commented wax coat. For a time I tried 2.1 bar (30.5 psi) front and 1.9 bar (27.5 psi) rear but now I'm using 2.3 bar (33.3 psi) on both axles and it seems better... I might not be a very sensible pilot...
A serious change of wheels should always come along with a tracking checking and adjustment. Other way uneven tyre wear or defective handling could appear.
 |
 |
The ideal driving position must let you turn the steering wheel completely with the back fully supported by the seat. In small cars like the GT Turbo (most french cars have this tendency), pedals are pretty close to the seat so if you adjust the seat to fully and comfortably use them, you might find you're a little far away from the steering wheel.
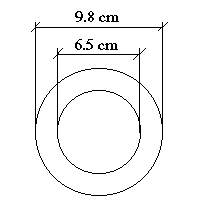
Procedure:Make a steering wheel separator. It's as easy as getting five 5 mm width (to use a 4mm Allen key) 20 mm+the desired separation length bolts and making a circular piece as showed in the figure. It has 65 mm internal diameter and 98 mm external diameter. The thickness is up to you (I used 20 mm). Undo the original Allen bolts and use the steering wheel to mark the precise hole locations. Drill the piece, mount and enjoy! |
 |
IMPORTANT NOTE: The standard steering wheel cone is already big, and as it suffers big forces, it tends to crack in the joint with the steering axle. When we add a separator, steering wheel vibration and the forces we apply both increase, so it's a matter of time to begin to crack. Although an abnormal free play is perceived before it breaks, as if it does while driving we'll finish with the steering wheel in our hands, it's interesting to reinforce the standard steering wheel cone by soldering.
As the steering axis isn't horizontal, the desired displacement comes with a little elevation that you must take into account.
Another point is that the turning lights lever becomes farther away. With 20 mm I found it just a matter of getting used, but if you radicalize about the thickness and plan to use the lights, start thinking about a lever extension too...
The standard GT Turbo shock absorbers are firm enough compared with the 'comfortable' kind of dampers you can find in other cars but as they do wear with time (50.000 km is an idea of their performance life, but of course they do work (worse) for more time), if you need a replacement you can find better shocks (gas/oil or gas, for example) and with harder settings to improve the road handling.
The rear shocks are a different case. They tend to last more as they're not carrying so much weight, and while a better quality is always desirable, there are people who think a firmer damper makes the tail jump too much on bumpy surfaces.
A good solution is to install adjustable shock absorbers. I chose a pair of yellow Koni Sport for the front and let my standard ones, still in their lifetime by the moment, at the rear.
To remove the whole front suspension strut, only two bolts secure it to the upper part of the stub axle carrier (Nuts always to the rear of the car) and other pair to the strut upper mounting. Tie the stub axle carrier to the brake hose support on the wing to avoid it to fall once the strut is removed.
Dismantling the front strut requires a coil compressor, and it must be done with care as a it can be very dangerous if the spring jumps suddenly. Mount the strut on a vice, compress the coil spring so that the upper mounting is free, withdraw the plastic cap and, holding the piston with an Allen key, undo the upper nut. Check, from down up, the spring, rubber bellow, spring seat, bearing (grease it), collar, rubber (nice to replace for new ones), mounting plate and cup. The collar and cup can be ovalated if you've driven with a loose upper nut, and a renewal might be necessary. Refit everything in the new damper following the reversal order of dismantling.
New dampers must be rolled, specially before getting them in the firm settings.
Adjust the dampers at your choice. The harder the setting you use, the better the car handles on good surfaces, with very fast turning speeds. But on bumps, the can tends to jump and lose adherence, so it's a matter of finding the firmness you like.
Koni shocks don't come with self-stopping nut, and they do tend to loose. It's much better to buy a pair of self-stopping nuts that will avoid this.
If you're planning to lower your car, you'll need shorter springs. It's smart to change dampers and springs at the same time.
With harder suspensions, the chassis must cope with increased forces. A strut bar can be an interesting idea to reinforce it.
