
![]()
![]()
Air enters the car through the front grille and bumper, but the bumper takes much of the precious water radiator area (Due to space limitations, Renault engineers didn't install a bigger radiator, but if you have to change your radiator, remember you can find a little bigger ones...). You can avoid that and get more fresh air -and a cool look- by making some openings there.
 |
Take the bumper off and open it over the plate space. A lot of small drillings, a few big lined drillings, or other kind of openings will work. If you choose big openings (that will provide more airflow), maybe you should paint black some of the inner bodywork to make it look better. You should also consider adding some mesh to prevent big particles or insects to enter the car (my father told me I had installed a sort of butterfly net there :-) ). I chose to make three ovoidal big openings, one in front of the radiator, one in front of the intercooler and one in front of the radiator screen, made by carefully drilling the outline and using a file. I added some black painted mesh, and that's all! |
Keep in mind that your bumper will be weaker now, and please don't break your artwork openings while parking!
Letting air enter your engine bay is good, but you should let it leave it once it's hot. And hot air is lighter than cold one, do you remember? Some bonnet vents will improve airflow.
|
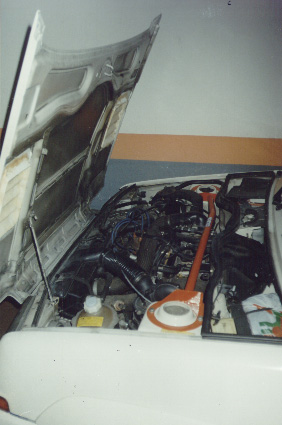
Get some bonnet vents. Remember that they should let the air get out of the car. The bigger the openings, the better. Then decide its location. It would be good to install them over the engine, because airflow through the radiator would be much bigger, but I wouldn't recommend you to moisten your distributor cap on a rainy day. It's up to you, but I chose big Sierra Cosworth ones and placed them over the front shock absorber struts. I suggest to make some paper pieces of the size of the panel you need to remove to install your vents, place them carefully, use color adhesive tape around the paper pieces, then remove them, drill all the inside line of the tape and file it. The actual installing procedure depends on your bonnet vent type, but above you have a picture of the outer look of my vents, and here you see a inner look, in which you may see the fiberglass used to keep the vents sticked to the bonnet. A little silicone outline completes my work, but a professional bonnet finish and painting should be done. |
 |
It's difficult not to ruin your bonnet with your drilling machine... that's the biggest problem I see to do it yourself, not counting the painting.
Not to let metal particles from drilling around your engine, you can use a big cloth under the hood if you decide to drill without removing it from the car.
Get a pair of plastic covers for the shock absorber struts to stop water from rusting the absorber's bolts.
What if you want to reduce the engine temperature, to prepare it for a really hot time, like in a summer highway traffic jam or racing a friend, but the engine isn't still hot enough to make the fan work itself? You could have a manual fan switch for those cases...
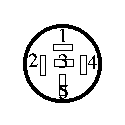
Procedure:Find a +12V live wire into your dashboard, tie it to a switch and take a second wire from it through the engine bay to the right side of the radiator. There's a relay there. Open the basis and tie the wire to the relay +12V coil excitation. That will be pin 2 or 4, the non-black of them, showed in the bottom base view scheme of the figure. |
 |
It would be nice to have an lamp integrated into the switch, or close to it, to know when the fan has been switched manually. If you prefer to know always when the fan is operating, as I do, let the manual switch be on or off, it's as easy as tying the same +12V switch output wire that goes to the fan relay to the lamp and put a ground to the other pin. If you just want to know when you're operating the fan manually, you can use a two-circuit switch and operate the lamp via the second circuit. Another procedure involves using a diode in series with the +12V wire that goes from the switch to the fan relay (anode to the switch and cathode to the fan relay) and feed the lamp from its anode.
Don't forget your manual switch when you stop your car and go home or you'll ruin your battery. If you prefer, you can use a +12V after the contact key to avoid this (as I did). A good point where you can find it is the windscreen wiper lever.
If you don't want your antipercolation fan to work for nothing, you would like to stop it whenever you want. This is interesting because you don't always care about percolation, like when you park and don't plan to use the car for the rest of the day, and/or you want to use a power consumption alarm.
Antipercolation fan doesn't have a relay. It would be nice to have it, because switch -your manual switch and the thermostatic switch- lifetime will be improved, so add it yourself.
It's easy to find a relay base on a junkyard, but buy a new relay (price's not worth an old one). Looking from the base, Renault SuperFive relays are like this:
|
Use the +12V going to the fan to activate the relay coil (Pin 4) but keep the fan ground for itself. Use the coil ground (Pin 2) to stop the fan whenever you want with a wire going to ground through a manual switch located in the dashboard. Find a strong +12V live (even without contact) wire in the engine bay -you can share the radiator fan relay big red one- and use it, through the relay (Pins 1 and 5), to activate the antipercolation fan itself. |
Remember that if you forget to let the antipercolation fan work but later you try to start the hot engine, -from 10 minutes to a couple of hours after switching the engine off-, you may get into problems.
The working temperature of your engine is maintained by the thermostat, located between two hose clips into the big hose that takes hot water from the water pump to the radiator. To make your car have a slightly lower temperature, therefore being prepared for a sudden increase, change the thermostat opening point. You can make the fan start working before, too.
Just go to the spare parts shop and ask for a cooler grade thermostat to replace yours. The temperature is written on the side (Format: Starting to open temp / Finished opening temp), mine was 83°C/93°C and I used a 73°C/83°C one. Don't forget to purge the cooling systems afterwards!
The same applies to the fan thermostatic switch (Now the format: Switch on ensured / Switch off ensured) I changed my 92°C/85°C to a 85°C/65°C one.
Some people remove the thermostat. That gets improved water flow, but a poor engine warming in cold weather, and working with a cold engine is bad both for performance and engine life. In addition to that, water passes too fast through the radiator wasting its cooling capacity and making the fan work too much (because hot water arrives to the fan thermostatic switch).
