
![]()
![]()
An important part of the braking power of a car is located in the brake pad quality. So the easier and faster braking improvement can be achieved just by choosing the right set of brake pads.
My personal choose was Ferodo Racing. They behave reasonably well when cold, and give a firm grip when hot.
The usual brake pad change: Disconnect the wear warning light wires, unbolt the guide pin bolts using two spanners, lift the caliper off the carrier bracket and secure it to the wheel arch taking care not to damage the brake hoses. Change the pads. Don't misplace the pad with the wear warning wire, placing it at the inner of the car, top position (bleed screw location). Bolt locking fluid and a torque wrench set to 35 Nm (26 lbf ft) should be used when remounting.
Let the pads adapt to the disc by not braking hard at least during the fist 200 kilometers, and be even more patient if you changed discs at the same time.
The GTT comes with front vented discs because during strong braking sequences, the discs reach very high temperatures, but because they had to fit into a 13 inch wheel, their size is not very big.
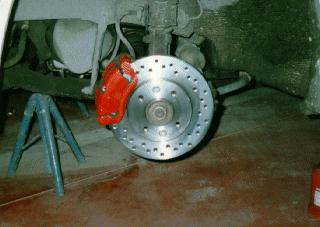
You can reduce disc temperature (and retardate 'fading') by using pierced discs. They allow greater air circulation and then better cooling. Another interesting effect is that it helps in the renewing of the brake pads surfaces. (The weight is also reduced by a small factor! :-) ). A grooved disc surface should be better for the above mentioned renewing, but it's worse for the rest of capabilities.
These are my Brembo Gold pierced discs:
Remove the whole brake caliper assembly undoing the two bolts on its back. Tie it to the wheel arch not to damage the brake fluid hose. Remove the two T40 Torx screws and the discs.
The mating surfaces of disc and hub must be spotless cleaned. Some sand-paper job might be necessary. That way you minimize the disc run-out. I borrowed a micrometer to do the final measures were:
| Maximum allowed: | 0.07 mm (0.003 in) |
| Left disc: | 0.046 mm (0.0018 in) |
| Right disc: | 0.107 mm (0.0042 in) |
The measure is a bit tricky to do, as you have to work out a proper support for the micrometer. If you are too out of limits, you can try out the other disc position (as it has two screws it can be mounted on two ways). I noticed an uneven braking at low speed that disappeared once the discs and pads were rolled over 500-1000 km.
You should use locking fluid for refitting.
Don't try to drill standard discs, as the disc surface has a thermical treatment that would be ruined with the drilling, and the disc needs a pretty exact balancing.
When you change discs, its recommended to change pads at the same time. Please be patient with their mutual adaptation allowing at least 500 km without strong braking that could crystalize the small areas with better contact with the pads.
As brake fading, comes from brake fluid boiling, a second approach to the problem is using a higher quality. I chose AP Lockeed DOT 5.1 fluid.
Get two 0.5 liter cans, as an adequate bleeding of the system will result in a lot of fluid loss. The removal of the old fluid via the bleed screws ensures the replacement but requires a good bleeding afterwards as the system will be full of air. The addition of the new fluid over the old one and bleeding until the color of the fluid that comes out changes can result in a mixture of fluids (Don't do it if you're changing of fluid type!) but will require less bleeding.
Now you must purge the circuit as follows:
Let the fluid still for at least 24 hours in their bottles before installing it to avoid bubbles from transportation.
It's very important to ensure the system is properly bleeded. Your personal safety is involved!
And the final suggestion: Be careful with the fluid. It likes to ruin paintworks!
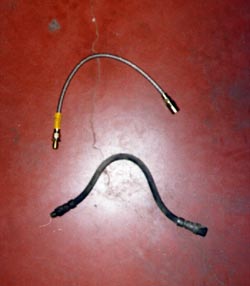
Intro:In a strong brake demand, the pressures at which you send the brake fluid to the calipers are very high. The brake lines are rigid in almost every part of the car, to avoid dilatations, but there are some points in which they are not: the flexible hoses at every wheel. The rubber hoses are very thick and should be pretty rigid, but you can improve that! Procedure:Get a set of competition type PTFE braided hoses. They are thinner, stronger and more rigid than the standard ones. You should note a stiffer brake pedal response. |
 |
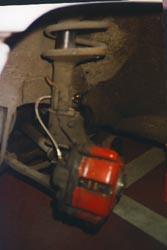 |
Get the hoses in a natural position. Be sure they don't touch the wheel arches or anything when you turn completely the wheels in both senses. It's very interesting to include a protection sleeve, which can easily be done with spiral wire protector (not shown in the photo).
You'll have to fill the brake fluid reservoir and bleed the system after the change as it's explained above.
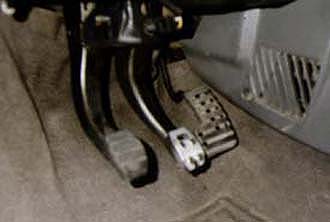
To ease the tip-heel manoeuvre, Renault gave us a L-shaped big accelerator pedal (that I miss as soon as I drive many other cars :-( ). But if you use the side of the feet to accelerate while braking, at least to my taste, the brake pedal sinks too much and it's easy to step a little the gas pedal, what means less braking effectivity, or a difficult foot position to avoid it that will result in a less effective braking.
Get a thick aluminium plate (3mm or so should be enough) and start working with the saw, hammer and file until you get something close to a pedal. You're free to make it as you please, but you can try to imitate the standard pedal shape. Replicating the holes too will let you use the standard rubber cover to disguise your trick. You'll need four (you can use three, but it's better to use 4 for the sake of rigidness) holes in the corners for the separating bolts too.
|
Buy 4 plane head 6 mm bolts, 4 plane washers and 12 nuts. Drill the standard pedal at the corners conveniently and use the first set of nuts to mount the bolts to the plate (you'll probably have to insert everything loose and tighten once mounted). Another set of nuts would let you adjust the plate height against the pedal, but I found my first set of nuts' height just perfect so I discarded this second set. Mount the plate over the pedal and use the washers and the last set of nuts under the pedal. Notes:The first times you drive with your modified pedal it seems strange to have to lift the feet so much (!) to brake, but in a couple of days it'll be as natural as before and much more effective! |
 |
